Lab 1: Artemis Setup and Communication
8 minutes read •
Lab 1a
During section 1a of the lab I installed the Arduino IDE and established a wired connection to communicate with the Artemis Nano. To connect I had to select the correct board and port in the Arduino IDE. Then, to test the connection and explore the Arduino environment I completed the following assigned example sketches in the Arduino IDE:
- Basics_blink
- Apollo3_serial
- Apollo3_analogRead
- PDM_microphoneOutput
Blink
You can see the Artemis board flash a bright blue led
Serial
Here we can see the Artemis recieves the string and echos it back 
analogRead Temperature Sensor
Microphone Output
From the video you can see the Artemis microphone successfully picking up the difference in sounds in the serial monitor
Lab 1b
Codebase and BLE
Bluetooth (specifically Bluetooth LE) at a high level is used to establish a connection between my computer and the Artemis:
Bluetooth LE radio acts like a community bulletin board where Computers (community members) can connect to read the board. If the radio is a bulletin board we call that a peripheral device (the Artemis in this case) and it is responsible for posting data. If the radio is a reader (central device) it reads from any of the bulletin boards. Essentially, central devices view the services, get the data, then move on, all within a few milliseconds allowing multiple central devices can get data from one peripheral.
Services are identified by unique numbers known as UUIDs. The ability to define services and characteristics depends on the radio you’re using and its firmware. Bluetooth LE peripherals will provide services, which in turn provide characteristics.
There are four things that a central device can do with a characteristic:
Read,Write,Indicate, andNotify
The codebase is collection of source code files that make up our system. Some important components:
The Artemis’ unique UUID and Mac address allow for undisrupted communication and transmission of BLExCharacteristics
ble_arduino.ino is the code running on the Artemis, edited in the Arduino IDE
EString is used when transmitting strings from the Artemis to your computer
RobotCommand.h is used when handling a robot command that the Artemis receives and is of the string format
<cmd_type>:<value1> <value2>|<value3>|…Demo.ipynb is where you find the python code sending commands to the Artemis
Some relevant functions used to communicate between the computer and Artemis:
send_command(cmd_type, data)to send a commandble.connect()andble.disconnectto connect with the Artemisreceive_string(uuid)to recieve a string from our boardstart_notify(uuid, notification_handler)to activate the notification handlerble.bytearray_to_string(byteArray)to convert recieved data into string
Configurations and Setup
I started with installing venv:
python3 -m pip install --user virtualenvI created the “FastRobots_ble” virtual environment inside my project directory:
python3 -m venv FastRobots_bleI activated the virtual environment: source
FastRobots_ble/bin/activateI downloaded the provided ble_robot_1.2 codebase into my project directory
It is now time to start the Jupyter server:
jupyter labUpdated the Artemis MAC Address on the Computer. Run the
ble_arduino.inofile in the Arduino IDE and check the serial monitor the MAC address:

- Generate new UUID: run
from uuid import uuid4anduuid4(). Input the generated UUID into the#define BLE_UUID_TEST_SERVICEline in ble_arduino.ino and into theble_service:line in connections.yaml


- Connect to the Artemis Nano via BLE
# Get ArtemisBLEController object
=
# Connect to the Artemis Device

Task 1
I sent a string value from my computer to the Artemis board using the ECHO command and the computer recieved and printed the augmented string
Arduino Code:
case ECHO:
char char_arr;
// Extract the next value from the command string as a character array
success = robot_cmd.;
if
return;
tx_estring_value.;
tx_estring_value.;
tx_estring_value.;
tx_estring_value.;
tx_characteristic_string.;
Serial.;
Serial.;
break;
Jupyter Lab Code:
=

Task 2
I sent three floats to the Artemis board using the SEND_THREE_FLOATS command and extracted the three floats in the Arduino sketch
Arduino Code:
case SEND_THREE_FLOATS:
float float_a, float_b, float_c;
// Extract the next value from the command string as an integer
success = robot_cmd.;
if
return;
// Extract the next value from the command string as an integer
success = robot_cmd.;
if
return;
success = robot_cmd.;
if
return;
Serial.;
Serial.;
Serial.;
Serial.;
Serial.;
Serial.;
break;
Jupyter Lab Code:

Task 3
I added a GET_TIME_MILLIS which makes the robot reply write a string to the string characteristic. GET_TIME_MILLIS had to be added to the cmd_types.py file. GET_TIME_MILLIS had to be added to cmd_types.py to run. Note that the output looks the same as in task 4.
case GET_TIME_MILLIS:
unsigned long elapsedT = 1;
elapsedT = ;
tx_estring_value.;
tx_estring_value.;
String strTime = ;
tx_estring_value.;
tx_characteristic_string.;
break;
Task 4
I setup a notification_handler function to receive the string value from the Artemis board and, in the callback function, extract the time from the string.
=

Task 5
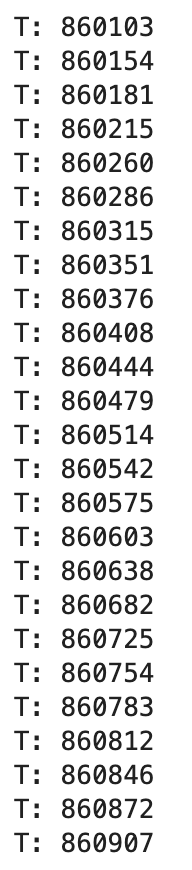
I made a twenty-five step loop that gets the current time in milliseconds using the GET_TIME_MILLIS function to then be processed by notification_handler(). From my output shown below you can see that there was an average 33.5 ms gap between the prints. This translates to 29.85 message transmissions per second. With each message being 9 bytes (1 char per each string sent), this results an effective data transfer rate of 269 bytes per second for this method.
= 0
=
+=1
Task 6
I created a command SEND_TIME_DATA that loops though to add generated time steps via the millis() function and then stores them in an array. Then, in SEND_TIME_DATA I loop through the array and send each data point as a string to my laptop to be processed. SEND_TIME_DATA had to be added to the cmd_types.py file. Note that millisArray[i] is defined as a global array.
Arduino Code
case SEND_TIME_DATA:
Jupyter Code:
Task 7
I created a second array to store fahrenheit temperature readings with the same length as the one used in task 6. Each index in both global arrays (millisArray[] and tempArray[]) correspond to each other. The command GET_TEMP_READINGS loops through both arrays concurrently and sends each temperature reading with a time stamp. The notification handler parses these strings and populates the data into two lists. Note that GET_TEMP_READINGS had to be added to the cmd_types.py file.
case GET_TEMP_READINGS:
Task 8
Rate wise, it is clear from the time steps in tasks 5 vs. 6 that method one is considerably slower at recording data than method two. This is because method one has to wait until the Artemis sends data to the computer after every round of collection before recording again. Instead, the second method can effectively record data as fast as its slowest sensor, thus producing data that may be more accurate but at the expense of a delayed reception on the client’s end. This could result in a slower response time from the robot and thus is less applicable if the robot needs to make time-sensitive decisions from sensor data. For an open-loop test where we do not care as much about real-time feedback, method two may be more useful as the faster data recording would provide higher resolution.
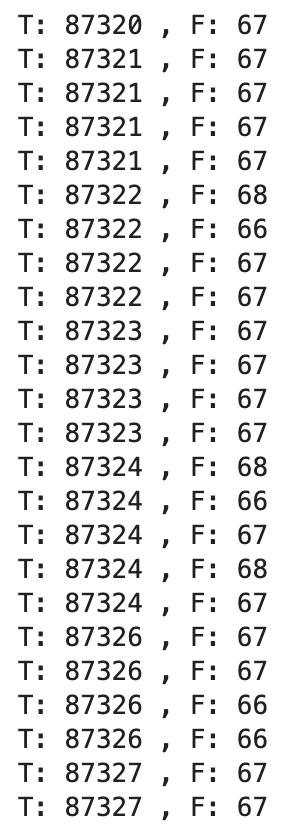
In order to determine how quickly the second method records data, I had to increase the number of loop iterations to 100 in order to see a difference in time steps. The first element is T: 104510ms and the 100th is T: 104512ms which translates to data being recorded every 0.02ms on average (considerably faster than the 33.5 ms gap in task 5).
The millis() int variable and getTempDegF() int variable are both stored as ints of 4 bytes each for a total of 8 bytes. As printed by the Arduino IDE output, global variables use 30648 bytes. If the Artemis board has 384 kB of RAM, then 353,352 bytes remain allowing us to store a total of 353,352 bytes/8 bytes = 44,169 data points without running out of memory.
Discussion and Conclusion (Lab 1A & 1B)
- Learned about what functions are responsible for communication between my computer and Artemis and how the commands (ECHO, GET_TIME_MILLIS, etc.) are passed in via
RobotCommand.h - At first I was confused about the relationship between different data types and their byte size. However, the later questions in the lab made it clear how ints vs. strings require different number of bytes as well as how Estring char are used to send those types to the computer
- The largest problem I faced was understanding the parameters needed for the notification handler!
Collaboration
I collaborated extensively on this project with Jack Long and Trevor Dales. I referenced Daria’s site for code debugging and specific help with SEND_TIME_DATA and GET_TEMP_READINGS. ChatGPT was used for Lab 1B code debugging and website formatting/development.